One of the best ways to add interest to a page on your website is by adding an appropriate photo or graphic. It is really very easy to do and there are a couple of ways to go about it. One way would be to add a page layout template when creating a button/page for your site. This template makes it easy to add headers, text and photos (and align them left or right on the page).
A second method which enables you to have more control over sizing, placement and the like, would be utilizing the “html editor” when creating your page.
In either case, first you upload your photos using the blue “images” button found on the left navigation bar when in your website design module. I like to try and have them sized to my task before I upload them. If I upload one that is too large, even though it can be visually resized in the editor, the larger kilobyte size can penalize your viewer’s download time. If too small, and you resize it up, it can pixelate and look of poor quality.
Now, let’s revisit the html editor [
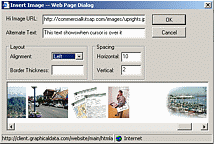
Note: this tool now to the Page Layout Tool]. Normally, you might first add text to your page…then in the approximate area you would like a photo to be placed, insert your courser at the beginning of the line of text. Then go up and select the small “picture (of a mountain peak)” icon in your html editor tool bar. Wait for all the photos to load horizontally, and then click on the one you want to appear on your page (see insert example above).
BUT WAIT….there’s more! There is also a field to add “alternative text” or what we call the “alt tag”. This is the text you see when you are surfing and you place your cursor over a picture and it pops up. This would be a good place to place a good keyword phrase.
AND MORE…In the Alignment section, select either left or right, depending upon which side of the page you would like your image to show. And while you are at it, note that there is also a spacing section. If you do not add space, the text will abut right up to the picture. So give the horizontal maybe 10 or 11 pixels. And you might need to adjust the vertical as well. If you need to revisit these selections after you have viewed you first results, first click on the picture (that is now on the page) and then click on the picture icon again in the menu bar…tweak and settings and view again. Once you’ve done this a few times, it will be a snap.
REMEMBER…once you have something you like, don’t forget to save your work (at the bottom of the page). If you leave the page without saving, you will lose all of your hard work.


